Just a short post today. I have been considering how to approach the subject of "drag and drop" when I came across Creation Cassel's video on it. Since I plan on using the phrase from here on out I would like you to take a moment to watch it. It doesn't last long.
Creation Cassel's drag and drop video.
If you have any further questions, just let us know.
Showing posts with label terms. Show all posts
Showing posts with label terms. Show all posts
Thursday, March 10, 2011

Wednesday, December 8, 2010
A sharper image
Today's post is going to short. Bug had asked me about unsharp mask and while I am fully capable of saying what it is, there are more than a few sites that describe in much more detail than I could.
The one I recommend is ScanTips. It is detailed enough and yet easy enough for a layman to read. Read then try it out on your next photo.

The one I recommend is ScanTips. It is detailed enough and yet easy enough for a layman to read. Read then try it out on your next photo.

HM_Melissa's template; A Winter Frost (c)A+ Designs, Kathryn Estry, Kristmess,
Spinkydink Designs (a Gotta Pixel Daily Download - Dec. 2010); Font(s): Hey Gorgeous, sf Jubilee
Spinkydink Designs (a Gotta Pixel Daily Download - Dec. 2010); Font(s): Hey Gorgeous, sf Jubilee
Saturday, November 20, 2010
Texting in the Round
Even old folks like me from time to time can learn new tricks. I have always used the floating text when applying with a vector shape. But the Bug (who else) had seen someone use a vector text on a vector shape but didn't understand it. So after half a night of playing with it, I think I caught on and am now a convert. I went through the video fairly quickly so below will be my written instructions.
Open new image (file>new). For this demonstration, I opened the new image at 6"x6" at 300 ppi, with a transparent background.
Click on the preset too and chose the ellipse shape. On the preset toolbar at top, chose draw circle. Set line with to 5 (just makes it easier to see). On the material palette make sure the foreground color is filled and the background color is null (no color). Draw your circle and click apply.
Now get your text tool. Chose your font and create as vector. Set the foreground color on materials palette to null and fill the background with color.
Place your cursor on the circle until it changes to an open "A" with a half circle below it. Left click and start typing. Don't worry if you overlap, we'll take care of this momentarily. Click apply when you have finished typing.
Your text will be bound by a box with nodes at each corner and in the middle of each line. Move the cursor over one of the corners until it changes to a cross of arrows with a rectangle above. Left click, hold and move down (or up) until your text is clear along the circle.
Now click on the plus sign next to the vector layer to show each of the vectors. Click on the eye next to the new ellipse layer to hide it. Right click on the vector layer and convert to raster layer. Your text is now ready to be used.
You can use this technique on other vector shapes as well. Go have some fun. Here's one using a vector in the shape of lips.


Open new image (file>new). For this demonstration, I opened the new image at 6"x6" at 300 ppi, with a transparent background.
Click on the preset too and chose the ellipse shape. On the preset toolbar at top, chose draw circle. Set line with to 5 (just makes it easier to see). On the material palette make sure the foreground color is filled and the background color is null (no color). Draw your circle and click apply.
Now get your text tool. Chose your font and create as vector. Set the foreground color on materials palette to null and fill the background with color.
Place your cursor on the circle until it changes to an open "A" with a half circle below it. Left click and start typing. Don't worry if you overlap, we'll take care of this momentarily. Click apply when you have finished typing.
Your text will be bound by a box with nodes at each corner and in the middle of each line. Move the cursor over one of the corners until it changes to a cross of arrows with a rectangle above. Left click, hold and move down (or up) until your text is clear along the circle.
Now click on the plus sign next to the vector layer to show each of the vectors. Click on the eye next to the new ellipse layer to hide it. Right click on the vector layer and convert to raster layer. Your text is now ready to be used.
You can use this technique on other vector shapes as well. Go have some fun. Here's one using a vector in the shape of lips.


Template by Poupoune; Gratitude collab (c)GoDigital designers
Font(s): Pea Weenie; Pea Porridge Hot
Font(s): Pea Weenie; Pea Porridge Hot
Tuesday, November 16, 2010
A smidge here & a smudge there
A wee more on cut-outs.
The tools: paintbrush and the smudge selection from the tool below the paint brush.
 Chose your photo and crop to the area you are wanting to use on your scrapbook page.
 Right click on the layer in the layer palette and promote to layer.
 Hold down the shift key and click on the new layer icon on the layers palette.
 Make sure the new layer is selected and zoom in to at least 100%.
 Using a bright color that does not appear in the photo and a fairly small brush (25 is what I settled on for mine); and a hardness of 50. Lower the opacity of the layer to about 60.
 Start painting a silhouette of the cut-out. Don't worry about stray hairs just yet. You may, during the course of painting, need to reduce the size of your paintbrush from time to time. You don't want to paint over the wisps, but you do what the get the larger areas.
 Hide the silhouette layer and open a new one. Using a very small brush (size 3-5 is good), paint over the wisps. You don't need to be precise, just a general direction and area.
 Move the wisp layer below the background layer.
 Select the silhouette layer and click on the selection tool. Now control+a; control+f; control+shift+f; then selections>modify>feather. Set feathering at 2.
 Delete the silhouette layer and with background layer selected: selections>promote selection to layer.
 Delete original background layer and make sure the promoted layer is now selected. Shift+d to deselect the marquee. Now grab your smudge brush and use these settings: Size-10; Hardness-5; Step-1; Density-100; Thickness-100; Rotation-0 and use all layers UNchecked.
 Using the wisp layer below as a guide, place the brush at the edge of the hair, left click, hold and pull along the lines.
REMEMBER: the bottom layer is just a guide. You don't have to worry about getting your smudges exactly in place.

The tools: paintbrush and the smudge selection from the tool below the paint brush.
 Chose your photo and crop to the area you are wanting to use on your scrapbook page.
 Right click on the layer in the layer palette and promote to layer.
 Hold down the shift key and click on the new layer icon on the layers palette.
 Make sure the new layer is selected and zoom in to at least 100%.
 Using a bright color that does not appear in the photo and a fairly small brush (25 is what I settled on for mine); and a hardness of 50. Lower the opacity of the layer to about 60.
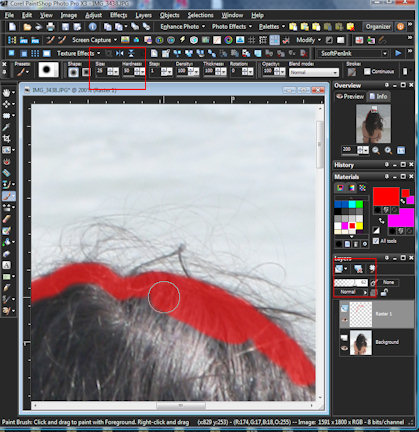 Start painting a silhouette of the cut-out. Don't worry about stray hairs just yet. You may, during the course of painting, need to reduce the size of your paintbrush from time to time. You don't want to paint over the wisps, but you do what the get the larger areas.
 Hide the silhouette layer and open a new one. Using a very small brush (size 3-5 is good), paint over the wisps. You don't need to be precise, just a general direction and area.
 Move the wisp layer below the background layer.
 Select the silhouette layer and click on the selection tool. Now control+a; control+f; control+shift+f; then selections>modify>feather. Set feathering at 2.
 Delete the silhouette layer and with background layer selected: selections>promote selection to layer.
  Delete original background layer and make sure the promoted layer is now selected. Shift+d to deselect the marquee. Now grab your smudge brush and use these settings: Size-10; Hardness-5; Step-1; Density-100; Thickness-100; Rotation-0 and use all layers UNchecked.
 Using the wisp layer below as a guide, place the brush at the edge of the hair, left click, hold and pull along the lines.
 REMEMBER: the bottom layer is just a guide. You don't have to worry about getting your smudges exactly in place.

Template by A+ Designs;
Beaches & Cream (c)Kristmess; Font(s): Pea Bev
Beaches & Cream (c)Kristmess; Font(s): Pea Bev
Wednesday, November 10, 2010
That Script of a Batch
I'm not a script writer and will never claim to be. But PSP allows us non-script writers a change to give it a try and occasionally I have found that it is especially helpful to know a little about it; especially when I am using in it in combination with the batch process.
The example I'm going to use here is to add a layer to templates with the designer's name and website, then include "Template by" in the info description dialogue box. Just a handy little trick so I don't always have to open (or even locate the designer's TOU. Mind you, if I will be using the template for something other than my own personal use, I will be opening the terms of use to make sure I don't even inadvertently mis-use their designs).
First thing we need to do is go back over the command buttons on our script bar that we will be using. We will be the two of the last four on the right side of the bar: Start (red button-8) and save (disk button-11). If at anytime you make a mistake and want to start over just click on the red "x" (10) next to the save button.
 I will be using Simply Yin templates for this post (Hi Yin). If the designer does not have their website in their their TOU, I would suggest you copy and paste it into the tou for future reference. Fortunately for me, Yin includes hers.
 Open your template in PSP (if it is a psd file and you get a message about unsupported features just click okay). Select your text tool, making sure it is set to a legible font, such as arial, times, etc., at about 15 points.
 Select the top layer and click on the red start button.
 Click somewhere on the layout and type in the designer's name and website (if you have the web in a text file, just copy and paste).
 Click "apply changes".
 Right click on the text (vector) layer and convert to raster, if you have your text set as a vector.
 Image>Image Information>Creator Information. In the description box put "Template by (and the designer's name)"
 Click on Save Script Recording.
 Give the script a unique name (I chose to use the designer's and a brief description).
 Save the template you were working on and close. Then go to File>Batch Process.
 For this particular batch, we need to browse for the folder of templates that we want to put this information on. Check: stop on error; use script; silent mode and overwrite.
 Once you click on browse you will need to locate the folder, then right click (in the folder window)>sort by>type. If you don't have "type" as a choice, click on more and scroll down to near the near. Check on "type" and okay. You will have to right click in the folder window again and it should be there.
 Now select the psd and/or pspimage template file, except the one you used to make the script if it is in this folder.
 Chose your recorded script and start.
 Now all you have to do is wait and watch. Depending on the file sizes and number of them, it may take some time, but a lot less than if you had to do this manually for each and every one.
 The downside to doing it this way (and not much of one in my book) is the designer information layer may not always be at the top or if may be over a layer that is the same or similar color, as seen below.
 The next time I use one of the templates, I will just move the designer info layer to the top and the over an area that is easier to see, saving it before using it.
 And while we are on the subject, make sure you duplicate the template before using (window>duplicate or shift+d) so that you don't accidentally overwrite it.
And as for the "Template by 'designer'" in your info box: remember when we went over keeping the name of the designer's, kits, fonts, etc., there? When you go to add the information, the template designer is going to be there already. Just one less thing you have to do or remember.
 Now go have some fun :)

The example I'm going to use here is to add a layer to templates with the designer's name and website, then include "Template by" in the info description dialogue box. Just a handy little trick so I don't always have to open (or even locate the designer's TOU. Mind you, if I will be using the template for something other than my own personal use, I will be opening the terms of use to make sure I don't even inadvertently mis-use their designs).
First thing we need to do is go back over the command buttons on our script bar that we will be using. We will be the two of the last four on the right side of the bar: Start (red button-8) and save (disk button-11). If at anytime you make a mistake and want to start over just click on the red "x" (10) next to the save button.
 I will be using Simply Yin templates for this post (Hi Yin). If the designer does not have their website in their their TOU, I would suggest you copy and paste it into the tou for future reference. Fortunately for me, Yin includes hers.
 Open your template in PSP (if it is a psd file and you get a message about unsupported features just click okay). Select your text tool, making sure it is set to a legible font, such as arial, times, etc., at about 15 points.
 Select the top layer and click on the red start button.
 Click somewhere on the layout and type in the designer's name and website (if you have the web in a text file, just copy and paste).
 Click "apply changes".
 Right click on the text (vector) layer and convert to raster, if you have your text set as a vector.
 Image>Image Information>Creator Information. In the description box put "Template by (and the designer's name)"
 Click on Save Script Recording.
 Give the script a unique name (I chose to use the designer's and a brief description).
 Save the template you were working on and close. Then go to File>Batch Process.
 For this particular batch, we need to browse for the folder of templates that we want to put this information on. Check: stop on error; use script; silent mode and overwrite.
 Once you click on browse you will need to locate the folder, then right click (in the folder window)>sort by>type. If you don't have "type" as a choice, click on more and scroll down to near the near. Check on "type" and okay. You will have to right click in the folder window again and it should be there.
 Now select the psd and/or pspimage template file, except the one you used to make the script if it is in this folder.
 Chose your recorded script and start.
 Now all you have to do is wait and watch. Depending on the file sizes and number of them, it may take some time, but a lot less than if you had to do this manually for each and every one.
 The downside to doing it this way (and not much of one in my book) is the designer information layer may not always be at the top or if may be over a layer that is the same or similar color, as seen below.
 The next time I use one of the templates, I will just move the designer info layer to the top and the over an area that is easier to see, saving it before using it.
 And while we are on the subject, make sure you duplicate the template before using (window>duplicate or shift+d) so that you don't accidentally overwrite it.
And as for the "Template by 'designer'" in your info box: remember when we went over keeping the name of the designer's, kits, fonts, etc., there? When you go to add the information, the template designer is going to be there already. Just one less thing you have to do or remember.
 Now go have some fun :)
Black Beauty (c)Armina Designs
Monday, November 8, 2010
Follow the script
Remember that script bar? Now is the time to put it on the toolbar.
 (I've undocked mine for this post, then it is going right back where it belongs). But for now let's look at what everything does.

 (I've undocked mine for this post, then it is going right back where it belongs). But for now let's look at what everything does.
 1. Name of the selected script; 2. Arrow for selecting script; 3. Run selected script; 4. Edit selected script; 5. Interactive script playback toggle; 6. Run script (opens restricted folder); 7. Stop script; 8. Start script recording; 9. Pause script recording; 10. Cancel script recording; 11. Save script recording.
Scripts are a string of commands allowing you to perform repetative or tedious actions in a shorter amount of time.
Because PSP uses Python to develope the scripts, there is a chance that a script you download can be malicious. To that end PSP has 2 folders: Restricted and Trusted. When downloading scripts they should be put in the Restricted folder. But occasionally you will run into one that needs to be put in the Trusted folder to work. Unless you are sure of the script writer (Sheilsoft Computer Systems; Cassel Creations; Bannerwoman are a few I trust), I would not suggest putting the script in your Trusted folder.
Many scripts come pre-bundled with PSP and we are going to look at few now. The script name will be under the image. Interactive scripts will open dialogue boxes so that you can make changes if you wish.
Scripts are a string of commands allowing you to perform repetative or tedious actions in a shorter amount of time.
Because PSP uses Python to develope the scripts, there is a chance that a script you download can be malicious. To that end PSP has 2 folders: Restricted and Trusted. When downloading scripts they should be put in the Restricted folder. But occasionally you will run into one that needs to be put in the Trusted folder to work. Unless you are sure of the script writer (Sheilsoft Computer Systems; Cassel Creations; Bannerwoman are a few I trust), I would not suggest putting the script in your Trusted folder.
Many scripts come pre-bundled with PSP and we are going to look at few now. The script name will be under the image. Interactive scripts will open dialogue boxes so that you can make changes if you wish.

Original Photo


Airbrush and Ink


Art


Black and White


Black and White Pencil (interactive)


Black and White sketch (interactive)


Charcoal


Color sketch (interactive)


Colored chalk


Dot method


Painted carved wood (interactive)


Watercolor


Wet watercolor
There are quite a few script writers on the web and below I will provide links to a few of my favorites. Before that though, lets look at some examples:

There are quite a few script writers on the web and below I will provide links to a few of my favorites. Before that though, lets look at some examples:

ddjHighKey, a free script (interactive)


ddjWallGraffiti, a free script (interactive)


SsoftColourist, a free script (interactive)
.jpg)
.jpg)
SsoftLithograph, a free script (interactive)
.jpg)
.jpg)
SsoftLithograph, a free script (interactive). Here you can see how I used the same script to make one b&w and the other color.
Scripts can do more than just make adjustments to photos. You can get some that matte, frame and stack them, as seen below.

Scripts can do more than just make adjustments to photos. You can get some that matte, frame and stack them, as seen below.

SsoftAutoMatte (interactive)


SsoftPhotoSet35mmNegative (interactive)


SsoftStacker (interactive). On this one I chose not to have the layers merge so I could move them around and add a drop shadow)


SsoftStripper, a free script (interactive)


SsoftTriptych, a free script (interactive)
As you watch them go through their paces will you be glad someone wrote the script for you. There are other scripts that will allow you to add copyright, make alphas, and more. Check them out and play with the ones you have. If you find that you are having a problem with one of the scripts, trying clicking on the interactive script playback toggle (#5). And have fun.
Now for the links:
SheilSoft
J.A.C. Backer
Pixelnook (make sure to pick up his VectorStroke script, I'll try to remember to do a post using it soon)
Free Stuff
As you watch them go through their paces will you be glad someone wrote the script for you. There are other scripts that will allow you to add copyright, make alphas, and more. Check them out and play with the ones you have. If you find that you are having a problem with one of the scripts, trying clicking on the interactive script playback toggle (#5). And have fun.
Now for the links:
SheilSoft
J.A.C. Backer
Pixelnook (make sure to pick up his VectorStroke script, I'll try to remember to do a post using it soon)
Free Stuff
dejudicibus (get the HighPass and WallGraffiti scripts. He also has a list and descriptions of the scripts that come bundled with PSP)

Template by Jennifer S. Wilson; Ravishing in Red (c)Connie Prince;
Fonts: Chopin Script; OptimusPrinceps
Fonts: Chopin Script; OptimusPrinceps
Subscribe to:
Posts (Atom)
