Stacy Carlson has written a wonderful tutorial on how to put together crayon boxes. If you have joined Gotta Pixel you will be able to download Sweet Digi Scraps pre-decorated boxes for free. But if you want to decorate it yourself you can do a search on crayon box template to find one. I chose to use one from Stampington & Company.
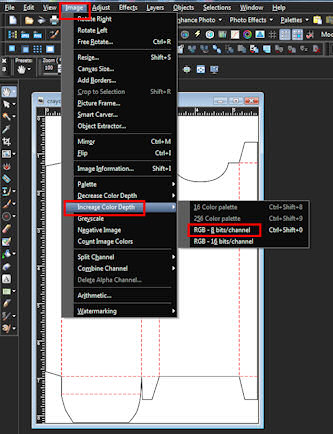
If your template is a gif (Stampington's is), the first thing you will want to do is increase the color depth: Image>Increase Color Depth>RGB - 8 bit/channel and save as a jpg.
Next on the order is resizing the template. For the Stampington template I had to resize it to a height of 5.31" or 1594 pixels at 300 dpi.

Promote background to layer.

Increase canvas size to height of 6.31", making sure ration aspect is locked and placement is center.

Select magic wand.

Set mode to add; match mode: RGB value; tolerance: 10; check contiguous; feather: 0; check anti-alias; outside.

Now select the white areas on the outside of the box and delete.

Using "Save as" save your template in the psd or pspimage format.

Now we can get started on decorating our box(es).
I'm using the "Spell on You" kit by Designs by Helly which I purchased at Gotta Pixel. Picking out a background, I've resized it just a tad larger than the height of my box.

Now I will copy (control+c) the background and clicking on the template to make it active, paste as a new layer (control+v). Hide the background layer and make the template layer active.

Control+a; control+f; control+shift+f while on the template layer. Make background layer active and unhide.

Got to Selections>Invert.

Hit delete on keyboard.

On your template layer, right click>Arrange>Move up.

Lower opacity so you can see background but still see the scoring folds.

Making the background active again, start adding the elements to round out the box. Use the scoring folds to determine size and placement. You can you use pick tool to resize; set mode to scale.

After your elements are placed and sized, hide the template layer. Make sure one of your element layers or background layer is selected. Right click on that layer>Merge>Merge Visible.

Unhide and activate your template layer. Chose your pen tool and set up: draw lines; uncheck connect segments; check create on vector; Line Style: solid or dashed; Width: 5; check anti-alias.

Set foreground color to a slightly darker color than your background if it is light or slightly lighter color if it is dark (I've used a grey to make it easier to see here). What we are going to be doing is making scoring folds for our boxes to facilitate Stacy's instuctions. You can use a guideline to make your lines straight or you can click on the beginning of the line, hold down the shift key and drag to the end.

After you have made your scoring fold lines, delete the template layer.

Lower the opacity of the scoring lines until they are barely visible.

Right click on one of the layers>Merge>Merge all.

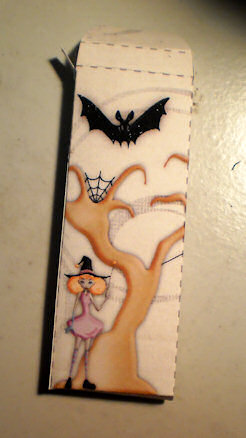
Save as jpg or tiff. Print, cut out and follow Stacy's instructions (link at top). Below are pictures of how my box turned out.


You might think it is a little late to get started on this and you are probably right unless you have just a few treaters. But keep it in mind just before school starts next year and crayons go on sell at the office supply stores. And, of course, using different kits you can make some nice favors to keep around at Thanksgiving and Christmas to keep the little ones entertained.
NOTE: for another cute and crafty idea using a different crayon box, check out "A Colorful Treat" by Jenn.

Template by Mandagirl; Bewitched (c)Candy Treats, Crystals Creations,
Brenda Mascari. Tooty Pup Scraps & Designed by Stina; Font: Arial
Brenda Mascari. Tooty Pup Scraps & Designed by Stina; Font: Arial
No comments:
Post a Comment
Note: Only a member of this blog may post a comment.