Find your picture and crop to the size you need for the layout. Write down the size.

In this example I promoted the background layer on my photo. You may want to do the same as there are several frames where you may want to delete part of the photo background. Go to Image>Picture Frame.

Click on the arrow in the picture frame box to see what frames you have available. Chose one that coordinates with your layout. I'm using the filmstrip. As you will see the frame is applied on it's own layer (this is new to the latest versions of PSP prior to 10 it was applied on the same layer as the photo).
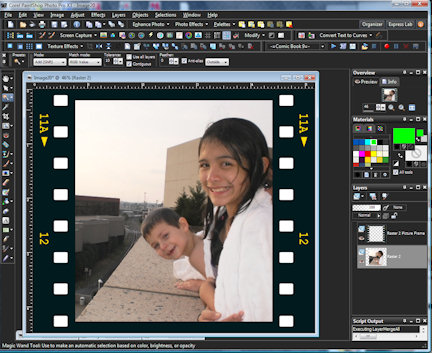
By having it on its own layer you can make changes to the frame or your photo without altering the other. On this one I wanted to get rid of the little white boxes along the side of the filmstrip. Using the magic wand and making sure that Use all Layers and Contiguous is UNchecked, I clicked on one of the white squares, then hit delete on my keyboard. Next: Layers>Merge>Merge Visible. Resize if necessary.

As I drop my picture/frame onto my layout, you can see through the holes to be background just like you would on a real filmstrip. I also lowered the opacity of my frame before merging to make it look more natural.

In the second example we will be using borders. Image>Add Borders. Quick NOTE: When using borders your photo will need to be in the flattened state. If it has been promoted then: Layers>Merge>Merge All.

In the add borders pop up, click on the color box and chose black. Check symmetric and make the pixel size one (by checking symmetric you will only need to change the number in one of the pixel fields, the others will adjust accordingly. If you don't have symmetric checked you would have to enter each field yourself). Why the 1 pixel black line you ask? It's so that when you select the next border we are going to make, you don't also select part of the photo.

Image>Add Borders. This time change the color to white and pixel size to 25 (more or less depending on how wide you want your frame).

With the magic want and contiguous checked, click on the white border.

Find the paper you want to use as the frame and drag to picture. Close the paper file. On the picture file with the paper layer selected: Selections>Invert. Delete. Add drop shadow. Merge>Merge Visible. Resize.

Drag to layout.

In this last example I am using a photo with rounded corners (you would use this with round or oval photos as well). The photo should be size you want it on your layout. Reduce the height and width by 26 pixels (if you have Lock Aspect Ratio checked then you will only need to change one).

Go to: Image>Canvas Size. Increase width and height by 1" each. Click on center placement.

Make a new layer (Layers>New Raster Layer) and drag below the photo. Make another raster layer.

On photo layer: control+a; control+f; control+shift+f. Click on layer below photo layer. Selections>Modify>Expand (1 pixel). Flood fill with black.

Click on layer below black layer: Selections>Modify>Expand (25 pixels or whatever amount you want your frame to be). Flood fill with white.

While marquee is still selected drag paper over. Invert marquee (Selections>Invert) and delete.

Select photo layer. Add drop shadow. Merge visible.

All that is left to do is place it on your layout. Have fun and happy scrapping.

Template by Isabel Mendez; Down by the Seashore
by Laurie's Scraps; Font(s): Arial
by Laurie's Scraps; Font(s): Arial
Hi
ReplyDeleteNice blog about film strip picture frame i like it
All things including the sets, props, costumes, styling, and characters will have to symbolize the time and background of the event.