First: Go get some glitter. I found my via Tink via the blogtrain via Trish H Designs. Phew. I took a picture of it for you:
Next she told me I need to put it in my PSP directory. Yaaa, right. Here is where it ended up for me:
If you enlarge it, you will see it ends up Corel\Corel Paint Shop Pro Photo X2\Corel_08\TrishHDesigns where TrishHDesigns is a directory I created and put the glitter into it.
Why go to all this trouble? To make my life easier every time I want to make something with glitter in it! You can do it, just keep following along. It's worth it! Go get a shape to fill in!
I got this heart. I want to put green or better yet red glitter in it. My shades of green or red. This is why I did the whole put glitter in the right directory thingie... (like my terminology?)
If you look to the right of your image, you will see Materials listed. I'll have to ask Tink what to do if you close it by mistake. I tried to find how to open it and the answer is well hidden.
See that dark black circle under the green square (yours might be some other color, but that is the square I want you to work with on this). Click on it and you will get a pull down. The last circle with the tic-tac-toe look is the 'pattern' circle. Click on it. Something similar to the window below should pop up.
From here click the window in the Pattern tab. Mine has wavy pink lines in it. When you click that, the following should show up:
Scroll down until you see the glitter you just added and select the one you want. Since I'm changing the color of mine, I selected the silver looking pattern.
You should then see this:
See how my green square is now gone and glitter is in it's place? Cool huh? Click on the little bucket to the left and then click in the middle of your heart (or whatever shape you picked). It should then look like this:
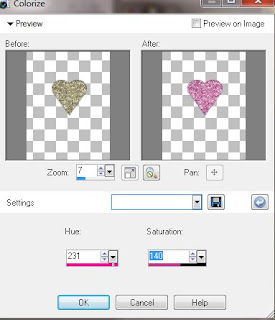
If that is the color you want. STOP HERE. If not, you can keep on reading. I wanted to make mine green. Why, I don't know. Just having fun. You go to the menu bar: Adjust -> Hue and Saturation -> Colorize. Like this:
Which will bring up this:
Ta da! Green glittery heart! Ok, I had to set the Hue and Saturation to what I wanted. Let's say I picked a red... like this one:
If you click on the color under the Materials, you can get the H (Hue) and S (Saturation) information. From there, I can go BACK to the menu above and change the numbers like this:
Cool! I know have a pink/red glitter heart. See:
I got the hue and saturation by clicking on the tiny red square under Materials. Just in case you didn't realize how I got to the numbers. Hope you enjoy adding glitter to your pages now!
And here is my March 2011 Calendar!
template: http://janellefam.blogspot.com/
Glitter: Trish H Designs
paper and element: "Kit Name" By Christy Skaggs
Glitter: Trish H Designs
paper and element: "Kit Name" By Christy Skaggs


No comments:
Post a Comment
Note: Only a member of this blog may post a comment.